CrossFTP & CrossFTP Pro Manual
1.1 About CrossFTP and CrossFTP Pro; 1.2 Connect; 1.3 Transfer Files and Directories; 1.4 Perform Web Search; 1.5 Manually Enter FTP Commands; 1.6 Execute Raw Commands;
2. Understanding and Using Main Interface
2.1 Identifying the window panes; 2.2 Displaying the Site Manager; 2.3 Displaying transfer items and logs; 2.4 Filter the contents in the directory panel; 2.5 Site Manager; 2.6 Global Options Dialog; 2.7 Fiters Dialog; 2.8 Search Dialog; 2.9 Synchronization Dialog; 2.10 View Certificate Dialog; 2.11 Queue Restore Dialog; 2.12 CloudFront Distribution Edit Dialog; 2.13 Extra Allowed Hostnames; 2.14 Transfer Logs;
3.1 File Menu; 3.2 Edit Menu; 3.3 View Menu; 3.4 Sites Menu; 3.5 Security Menu; 3.6 Queue Menu; 3.7 Tools Menu; 3.8 Help Menu;
1. Getting Started
1.1 About CrossFTP and CrossFTP Pro
CrossFTP is a versatile, cross-platform GUI FTP client based on Java technology. You can easily understand and use CrossFTP whether you're a novice or accomplished FTP User. In CrossFTP you will find a variaty of features available to offer a satisfying FTP exploration and transportation.
CrossFTP Pro embodies the accumulated knowledge in the development of CrossFTP to provide enhanced file transportation and security features. You can speed up the transfer of huge number of small/middle sized files by the multi-thread transportation. Secure transportation protects your important data in a safe channel.
CrossFTP works on a series of operating systems, such as Windows, Mac OS X, and Linux. Its System requirement is Sun Java 1.4 or higher, which is supported by most of current operating systems. As a result, it avoids the pain to learn and migrate to unfamiliar FTP tools. You will have a similar user experience when switching between different operating systems.
1.2 Connect
Prerequisite: Before you can connect to FTP sites, you must be connected to a Local Area Network or your Internet Service Provider (ISP).
Using Quick Connect
- Fill in the quick connect toolbar's host, port, etc. Paste, or type your ftp address in this input text field. The format is ftp://username:password@ftp_address:port. The username, password and port can be omitted. The default user name and password are ANONYMOUS, and the port is 21. After that, click

- Click the button on the popup menu, or choose one site from the following menu.
Using New Connection To...
- Go to File -> New Connection To... , or toolbar's connect button -> New Connection To...
- The site manage will be opened with a new FTP site created. Enter your FTP site's information like address, username, password, port, etc.
- Press the button.
Using Site Manager
- Press button, enter your new site name
- A new FTP site will be created at the site manager.
- Enter your FTP site's information like address, username, password, port, etc.
- Press the button.
Reconnect to the Last Site
- Press the toolbar's connect button, -> Reconnect: ...
Disconnect from Current Site
- Press the toolbar's
 disconnect/unbundle button.
1.3 Transfer Files and Directories
Using Popup Menu
- Open the popup menu in the directory pane.
- Press Transfer/Copy.
Using Queue and Start Transfer
- Open the popup menu in the directory pane.
- Go to Queue.
- Press the
 Start button on the toolbar, or Start Transfer in the Queue menu.
1.4 Perform Web Search
Using Web Search Bar
- Input your search content in the edit box.
- Press the
 Search Web button.
Using Popup Menu
- Open the popup menu in the directory pane
- Go to Search Web.
1.5 Manually Enter FTP Commands
- Choose the remote directory pane which you want to send your FTP commands to.
- Input your FTP Commands on the command bar.
- Press the
 Submit button, or type return in the command bar.
1.6 Execute Raw Commands
- Choose the local directory pane which you want to execute the shell command at.
- Input your Raw Commands on the command bar.
- Press the Execute button, or type return in the command bar.
To enter the predefined commands for certain FTP Server, you can right click the input bar on the command bar. The popup menu will display a list of server categories which contains the predefined commands for these servers. Currently the supported server categories include glFTPd, glFTPd admin, RaidenFTPD, ioFTPD, Serv-U and DrFTPD. If you want to customize the command list, you can directly modify the command file located at ~/.crossftp/ftpcmd.xml
2. Understanding and Using Main Interface
2.1 Identifying the window panes
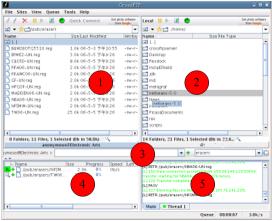
The CrossFTP widow contains five major panes:
- Left Directory Pane
- Right Directory Pane
- Command Line Bar and Web Search Bar
- Transfer Queue Pane
- Log Message Pane
To hide the Command Line Bar and Web Search Bar:
- On the menu bar, go View -> View Command Line
- Click until the check mark disappears. (Or click until the check mark reappears to show the bar)
2.2 Displaying the Site Manager
On the Menu bar:
- Go to Site -> Site Manager.
On the Tool Bar:
- Press the Connect button.
- Go to Site Manager.
2.3 Displaying transfer items and logs
The transfer queue pane and log message pane is located at the bottom of the main window. To hide/show the transfer queue pane and log message pane:
- Click the expand/collapse icon on the horizontal splitter to hide/show the pane.
2.4 Filter the contents in the directory panel
The ![]() filter/search box is located at the right bottom side of the directory panel. The content of the directory panel will change according to the inputting texts in this box.
filter/search box is located at the right bottom side of the directory panel. The content of the directory panel will change according to the inputting texts in this box.
2.5 Site Manager
A site manager is the place to access all quick connected and saved site entries. All of the quick connections are listed under the Quick category, and the saved sites are listed under the Site category.
Create a new site within the currently selected category.
Create a new category in the currently selected category.
Delete the currently selected site or category.
Save any changes to the currently selected site.
Connect to the currently selected site.
Close the Site Manager. You will be prompted for any unsaved changes to the current site.
2.5.1 General Panel
- Label - The site's label name that will appear in the site manager.
- Address - Enter the FTP Site address. The FTP site address is used to identify the FTP site to which you want to connect. For the IPV6 address, please wrap the address in the bracket so that the program knows that is is an IPV6 address. For example, [2001:0db8:0:0::1428:57ab]
- Port - Port number of the FTP server to connect to. Usually this is 21.
- User Name - User name used when logging in the FTP server. For anonymous servers, please check "Anonymous". For Amazon S3 site, Access Key ID should be filled in here (See Amazon S3 protocol). For MobileMe iDisk site, please click the iDisk button, or fill in your specified password (see iDisk protocol).
- Password - Password for the FTP server. If Anonymous is not selected and this field is blank, CrossFTP will ask for it when connection is made. For Amazon S3 site, Secrete Access Key should be filled here (See Amazon S3 protocol). For MobileMe iDisk site, please click the iDisk button, or fill in your specified password (see iDisk protocol).
- Protocol - The type of the protocol of the remote site. CrossFTP supports the normal FTP protocol. The CrossFTP Pro supports FTPS/SFTP/WebDav(s)/S3 protocols. The followings are the more detailed description for these protocols:
- FTP Standard Protocol (No SSL) - Disable the security transfer features.
- FTP with Implicit SSL - Creates a secure connection from the very beginning and encrypts all communication between the client and server at all times. Only certain FTP servers support implicit ssl.
Both AUTH SSL and AUTH TLS allow you to specify which parts of the connection to secure. ie, file listings, transfers, or both. In either case, login information is ALWAYS sent encrypted.
- FTP with Explicit SSL (Auth SSL) - Performs a standard FTP connection first, and then issues an AUTH SSL to establish a secure connection before sending the login information.
- FTP with Explicit TLS (Auth TLS) - Performs a standard FTP connection first, and then issues an AUTH TLS to establish a secure connection before sending the login information.
- SFTP/SSH - Performs a SSH connection for secure transfer. We support SSH version 2 and 3. The authentication method include the password athentication, server cert authentication, and client key authentication.
- WebDav - Performs a HTTP based WebDav protocol connection.
- WebDav/HTTPS - Performs a secure HTTPS based WebDav protocol connection. The authentication methods include password basic authentication, server cert, client cert, and Kerbros.
- .mac iDisk - choose the WebDav protocol, and fill in the site information as follows, in which user name should only contain your chosen name, without the "@mac.com":
Host: idisk.me.com
Port: 80
User name: ReplaceWithYourUserName
Password: ReplaceWithYourPassword
Protocol: WebDav
RemotePath: /ReplaceWithYourUserName/
The detailed guide on how to setup this is available here. - Secure .mac iDisk - choose the WebDav/HTTPS protocol, and fill in the site information as follows, in which user name should only contain your chosen name, without the "@mac.com":
Host: idisk.me.com
Port: 443
User name: ReplaceWithYourUserName
Password: ReplaceWithYourPassword
Protocol: WebDav/HTTPS
RemotePath: /ReplaceWithYourUserName/
P.S. It seems that the .Mac's certificate does not conform to the standard format, and this causes an error to make the HTTPS connection handshaking. To avoid this problem, you can choose "Global Options -> Connection -> Always Trust Server Certificates" to bypass certificate verification. However, you need to pay more attention to make sure the host is not malign in this case.
The detailed guide on how to setup this is available here. - Amazon S3 - Choose the S3 protocol, and /HTTPS means this data transfer is encrypted by TLS/SSL connections. Filll in the site information as follows:
Host: Automatically filled as s3.amazonaws.com
Port: Automatically filled as 443
Access key: Your Access Key
Secret: Your Secret
The detailed guide on how to setup this is available here. - Google Cloud Storage - Choose the Google Cloud Storage protocol, and /HTTPS means this data transfer is encrypted by TLS/SSL connections. Fill in the site information as follows:
Host: Automatically filled as commondatastorage.googleapis.com
Port: Automatically filled as 443
You can choose the Auth to be either Access Key based or OAuth based.
The detailed guide on how to setup this is available here. - Amazon Glacier - Choose the Amazon Glacier, and /HTTPS means this data transfer is encrypted by TLS/SSL connections. Fill in the site information as follows:
Host: Automatically filled as glacier.us-east-1.amazonaws.com
Port: Automatically filled as 443
Access Key: Your Access Key
Secret: Your Secret
The detail guide on how to setup this is available here.
- Proxy/Firewall - The proxy you used to connect to the FTP server. Before you can choose your prefered proxy, you need to define the available proxy list first in the "Global Options -> Connection".
- Remote Path - The path you want to start with on the FTP server.
- Local Path - The local path you want to start with when connecting to the site.
- Comments - A place to write comments about the FTP server.
2.5.2 Actions Panel
Show the File Overwrite Options Dialog to configure this site's actions for when a file of the same name to be transferred already exists on the server.
In the File Overwrite Options Dialog, following options are available:
- Ask - CrossFTP will show a new dialog "Confirm File Overwrite" that prompts for which action to take.
- Overwrite - The existing file will be automatically replaced by the transferred file.
- Skip - CrossFTP will automatically skip to the next file to be transferred. The existing file will not be changed.
- Resume - Automatically resume the transfer of the file. This is only available when the existing file is smaller than the file to be transferred.
- Rename - If the file was named file.txt, then the transferred file will prompt a name input dialog to ask for the new name for the file.
2.5.2.1 File Name Case Conversion
When Upload / Download is made, convert the file name's case according to the setting.
- (default) - uses the global setting defined in Tool -> Options -> Transfer -> File Name Case Conversion
- Don't convert - Keep its original name.
- Lowercase - Lowercase all the characters in the file name.
- Uppercase - Uppercase all the characters in the file name.
- First character uppercase - Uppercase the first character and keep the other letters as original.
2.5.2.2 Retry Options
- Retry Delay (s) - When a connection to a site fails, CrossFTP will wait this many seconds before trying to connect again. When this option is blank, the setting in the global options will be used.
- Retry Count - This is how many times CrossFTP will attempt to connect to the FTP site. When this option is blank, the setting in the global options will be used.
2.5.3 Security Panel
The toggles displayed in this panel works for the FTPS protocol. That is, FTPS/Implicit, FTPS/SSL, FTPS/TLS, S3/HTTPS, and WevDav/HTTPS.
- Secure File List - Enables/Disables secure file listing.
- Secure File Transfers - Enables/Disables secure file transfers.
- Secure Site to Site FTP Transfers (not supported by all servers) - whether use secure file transfer during FXP (Site to Site) transfer.
- Use Clear Command Channel (CCC) after Login - makes a secured control/command channel revert back to plaintext (un-secured) after login. This option can be useful to pass through some NAT router, since some NAT routers can open the incoming port for data connection, when they examine the unsecured PORT command sent through a clear control channel. If the command chanel is secured, the NAT routers will fail to interpret the PORT information, and block the data connections.
Trusted Servers and CA, as well as Client Certificates are the stored TLS/SSL certificates for your servers, and you local machine respectively.
Secure Options for SFTP/SSH configures the public key authentication for SSH server.
- Private Key File - Fill in the location for OpenSSH's private key file. You should get this file from your SSH server's webmaster.
- Private Key Passphrase - The passphrase for the private key file. You should learn the passphrase from your SSH server's webmaster.
If your key file is not in the OpenSSH format, you need to convert the other key format into OpenSSH format so that CrossFTP can read. This page is a guide for you to convert after the installation of OpenSSH. Or you can use this online conversion service to do the convert.
2.5.4 Options Panel
2.5.4.1 ComboBox list options
- Connection Mode - The type of connection used at the remote site. PASV is normally compatibility with proxy servers, firewalls, and so on. When PASV is chosen, the client (you) makes an outgoing connection to the ftp server. When PORT is chosen, the ftp server makes an incoming connection to the client (you). If Use Global Setting is chosen, the setting in the global options will be used.
- Transfer Mode - the mode which should be used to transfer files.
Use Global Setting choses the setting in the global options. ASCII mode is appropriate for files which only contain plain text. Binary mode is used for files which do not contain only plain text. Auto-Detect is the default and recommended method. CrossFTP will choose which method to use based on filename extension. Files will be transferred in binary mode unless their extensions are in the ASCII filter list. - Server Encoding - The character encoding used on the ftp server to show the file list. For western characters the encoding is normally ISO-8859-1. For China, Japan, and Korea, it normally use CJK character set like GBK. If Use Global Setting is chosen, the setting in the global options will be used.
- Max Logins - The maximum number of connections that is allowed to connect to this site simultaneously. CrossFTP will forbid the new connections if the concurrent connections exceed to this number. If 0 is used, no limitation is made on the number of concurrent connections.
- Server Type - the type of server used at the remote site. The choices are Unix, Windows, or VMS.
- Server End-of-Line - The remote file's end-of-line (EOF) type. Unix servers have the LF as EOF. Windows servers have the CR+LF as EOF. Same as Server Type will decide the server's EOF according to the Server Type choice, and the default Server Type is Unix Server.
2.5.4.2 Toggles
- Send Anti-idle to keep alive - Try to keep the connection alive by sending a command to the FTP site while scrolling through a list of files or if being away from the computer. When this option is selected, CrossFTP uses the anti-idle command settings in the global options.
- Cache Directories - When selected, the remote file listing is stored locally in a cache file to fasten the browsing time and reduce the netwrok overhead.
- Use Skip List - When selected, the skip list allows you to enter masks of items you want to skip when you transfer files. CrossFTP uses the setting in the Skip List dialog.
- Send "LIST -al" - Display all files on the remote server, including the hidden files.
- Substitute PASV IP with Server IP - Replace the server's reported IP address in PASV command with its real remote IP address. This helps to solve the problem when a router is located between the server and the client, and the router's IP address is accessible rather than the server's real IP.
- Attempt to Resolve Link Files - If this option is chosen, CrossFTP will try to parse the remove site's link files to get the target object, so that the display/download of the linked file will processing the real target object, rather than only the link. If this option is not chosen, the link file itself will be displayed/download.
- Data Compression (mode Z) - In this mode, the client will negotiate with the FTP Server and then compress the transferring data on the fly using Zip compressing algorithm.
- Use Relative Path - Use the related path rather than the absolute path in the download/upload transfer. Some FTP Server only supports the relative path, of which you can select this option.
2.5.5 Bookmarks Panel
Bookmarks allow you to set "favorite directories" in CrossFTP. This way it is easier to browse your hard drive or remote ftp site.
2.6 Global Options Dialog
Configure CrossFTP's global settings. Many of these settings can be customized on the Site Manger for each site as well.
Opens the help manual.
Save any unsaved configuration changes.
Abort any unsaved configuration changes and close dialog.
2.6.1 General Panel
2.6.1.1 General
- E-mail address - Enter the address you want to send to servers that require an e-mail address for anonymous logins. By default CrossFTP sends a simulated e-mail address.
- Default Download Path - Browse or type the path where CrossFTP will download files by default.
- Log file - Browse or type a path to the folder where you want to save your log files.
- Log level - The threshold of messages that are allowed to be written in the log file. Off stands for closing the log. Error stands for the error messages only. Info stands for all types of information received. Debug includes the standard information and debug information as well.
2.6.1.2 Limits
- Connect Timeout - The number of seconds that CrossFTP will wait for a site to respond to the connection request.
- Connect Retry Delay - When connecting to a site fails, the number of seconds that CrossFTP will wait before attempting to retry to connect to the site.
- Connect Retry Count - The count of times CrossFTP will attempt to connect to a site before abort.
- Concurrent Transfers - Choose the number of simultaneous queue transfer connections you will allow from CrossFTP.
2.6.2 Connection Panel
- Connection Mode - The type of connection used at the remote site. PASV is normally compatibility with proxy servers, firewalls, and dsl/cable routers. When PASV is chosen, the client (you) makes an outgoing connection to the ftp server. When PORT is chosen, the ftp server makes an incoming connection to the client (you).
- Server Encoding - The ftp site's default encoding to show their file list. Change this if the directory list has problems in its displaying encoding. Each site can specify its server encoding as well on Site Manger.
- Max Login Per Site - The maximum allowed concurrent connections for the site. When multiple thread transfer is being processed, this limitation will help to do the concurrent control. The site's Max Login option can overwrite this global definition.
- Verify Server Certificates - Verify the remote server's certification and hostname during a TLS/SSL handshaking phase. Three level of verifications will be provided: Strict (verfity certs and hostname), Default (verfity certs only), and Allow All (no check).
- Certificate verification means the certificate should be derived from a public CA's signed certification, or from a certificate in your trusted keystore. If a private server certification is being varified, a popup dialog will be dipslayed to ask you whether you want to trust it. Choose Always to save the certification in your trusted keystore.
- Hostname verification means the server's hostname should match the CN field in the server's certificate. Our Strict level verification is similar to the IE's verification procedure. If there is a wildcard in the CN field, the level one subdomain of the server's hostname is a match, while level two subdomain is treated as a mismatch. For example, *.crossftp.com in the CN field will match a.crossftp.com, but not b.a.crossftp.com.
- Active Mode Port Range: If a range (e.g., 5000-5010) is filled in this field, this range will be used to limit the ports that can be used in the FTP's active mode (PORT command). This is useful if you want to port foward your extneral connections from your router to your machine.
- Active Mode IP Address: You can fill in an IP address or domain name in this filed, and this filled address will be notified to FTP server in the Active Mode (PORT command). This is useful if you are behind a router that blocks you and your server. You can fill in your router's address here so that your server can link to your router instead of being blocked.
2.6.2.1 Proxy/Firewall
Proxy enables you to bypass your own Internet provider and browse through the proxy site. All that you have to do is type the proxy address you would like to use, and and start browsing. We allow you to inut a list of Proxies in our CrossFTP, and make some proxy as your default one.
- Name - The name of the proxy
- Status - Whether the proxy is used by default or not
- Make the selected Proxy as default connecting proxy
- Add a new proxy in the proxy list
- Edit the selected proxy
- Delete the selected proxy
When you click the button to add one proxy, an add proxy dialog will be shown for you to make the input. The main fields in this dialog are shown as follows:
- Name - The name you chosen to identify the proxy
- Type
- This is the type of your Proxy Server. Possible Settings are:
- HTTP proxy
- Socks 4 proxy
- Socks 5 proxy
- FTP OPEN - FTP proxy by OPEN command
- FTP SITE - FTP proxy by SITE command
- Host - The machine name of your Proxy server; can be either a named address or an IP address.
- Port - Type the proper port for the proxy server. This is usually 21 or 1080 for Socks 4 or 5.
- User - This is the account name or user name that is used to connect to the proxy server or firewall.
- Password - The password required to access the proxy.
2.6.2.2 Anti-Idle
Send anti-idle commands to the server to prevent the connection from timing out and disconnecting due to inactivity. Possible Anit-Idle commands can be chosen from:
- NOOP - No Operation
- PWD - Print Working Directory
- LIST - List Files/Directories, does not update the file listing.
- CWD . - Change Working Directory to Current Directory.
- RANDOM - Randomly choose a command from above.
You can type the period of time in seconds between anti-idle commands.
You can also type the maximum total amount of time to send anti-idle commands.
2.6.3 Transfer Panel
- Transfer Mode - Select the mode which CrossFTP should use to transfer files. ASCII mode is appropriate for files which only contain plain text. Binary mode is used for files which do not contain only plain text. Auto-Detect is the default and recommended method. CrossFTP will choose which method to use based on filename extension. Files will be transferred in binary mode unless their extensions are in the ASCII filter list. See Site Manager as well.
- Verify CRC Checksums (From SFV Files) - If this toggle is selected, the transferred item will be checked against its CRC checksums when the checksum file (*.sfv) is available in the same directory. By default the checksum file (*.sfv) has higher priority for transfer in the queue. See Tools -> Filters -> Priority by Extension.
- bundle main window - When checked CrossFTP's transfer engine will try to update the directory panel's contents as the transfer is being performed.
- Auto Refresh Local Directory Content - Whether to refresh the local directory when the transfer is finished.
- Obey download speed limit - When checked CrossFTP will limit the download speed to the user defined rates.
- Obey upload speed limit - When checked CrossFTP will limit the upload speed to the user defined rates.
2.6.3.1 File Name Case Conversion
- Don't convert - Keep its original name.
- Lowercase - Lowercase all the characters in the file name.
- Uppercase - Uppercase all the characters in the file name.
- First character uppercase - Uppercase the first character and keep the other letters as origianl.
2.6.4 Operation Panel
- Show hidden files in the local browser - When checked, the directory panel will show all the files in the local machine, including the hidden files.
2.6.4.1 New Shell Command
- Command - Please type in the command to launch the shell window. By default, CrossFTP will launch command window in Windows system, and xterm in *nix system.
- Parameters - Please specify additional parameters for the command.
2.6.4.2 Editor for F4
Similar to the Windows Commander/Midnight commander, CrossFTP support the quick view (F3) and quick edit (F4) operations.
- Editor - Please type in or browse your favorite editor to editor the selected file. When a local file is selected, pressing F4 will invoke this editor to edit the file.
- Parameters - Please specify additional parameters for the command.
- View Encoding - The default encoding used for the quick viewer when F3 is pressed for the selected file.
2.6.5 Sound & Trigger Panel
Sounds and command triggers can be associated with events happened in the CrossFTP.
- Enable Sound Events - Enable the playing of sounds with events as defined in the Event table.
- Enable Command Trigger - Enable the execution of commands with events as defined in the Event table.
- Event Table - The table of events with their associated sound files and commands.
- Sound - Type in or browse the sound file for the event.
- Trigger Command - Type in or browse the command for the event.
- Trigger Parameters - Type in the parameters used in the event. Some macros are allowed:
- %file stands for the full file path and its name.
- %filename stands for the file name only.
2.6.6 Behavior Panel
The default behavior for the mouse drag, mouse click and open a new Tab.
- Drag and Drop - When an item is dragged on to the pane, the default behavior can be chosen as Transfer or Queue.
- Keymap Profile - Predefined shortcuts for the actions. It needs to restart the program to take effect.
- Double Click / Enter Pressed - Configure the default behavior when mouse is double clicked on the panel, or on an archive file. The behavior chan be chosen as Open (open the file), Queue, Transfer, and nothing. Support tar.gz archives will enable the archive browsing for file types of tar.gz. The openning of such archive file may take a few seconds.
- On New Tab - The default behavior when a new tab is opened. If the user chooses to duplicate the content, the new panel's content will be the same as the current panel.
2.6.7 Display Panel
The look and feel configurations for CrossFTP. Most of the changes on this panel will take effect only after restart CrossFTP.
- Locale - The default locale for CrossFTP. This will change the window interface language if available.
- Look & Feel - Change the look and feel of CrossFTP. This will affects CrossFTP's default using skin and its behaviors as well.
2.6.6.1 Log Text Color
The displaying color for the log pane. Choose colors for the following parts of the log text:
- Command - Submitted commands.
- Left Reply - Left directory panel's reply message.
- Right Reply - Right directory panel's reply message.
- Info - General information
- Error - Error messages
2.6.6.2 Table
- Background - The background of all the tables, including directory panel, queue panel, etc.
- Link & Archives - The text color of FTP link files and local archives files. The supported archives files including .ear|.jar|.war|.zip|.tar|.tgz|.tar.gz|.tbz2|.tar.bz2|.tar.bzip2
2.6.6.3 Tab Position
The position of the tab bar for the local and remote panes. The bar can be located at Top, Left, Right, and Buttom.
2.6.6.4 Fonts
The default fonts used in CrossFTP.
- Tables - Choose fonts used in the tables, such as directory panels, queue panel.
- Logs - Choose fonts used in the log pane.
2.6.6.5 Queue Thread Colors
Each queue thread will be labeled by a specific color so that you can easily identify how the queue threads are processing the queue items. This is shown in the log pane's tab label, as well as the background on the queue panel's status icon. Choose your favorite color for each queue thread.
2.7 Filters Dialog
Define rules which control which files are transferred, how they are transferred.
Add the entry in "File Extension:" to the "Extension List".
Remove the currently selected entry from the "Extension List".
Save the pending changes.
Abort any changes and close the dialog.
2.7.1 ASCII List
Specify a part of a file name or the extensions of files which will be transferred in ASCII when the transfer mode is set to Auto. A file name does not need to have an extension. The transfer engine will choose ASCII mode if the file is ended with some item listed in this list.
- Extensions - Type in a new extension or file name.
2.7.2 Priority by Extension
Specify the extension of files which will be enqueued in a higher priority than the rest files. Once the files have been added into the queue, its priority will not be changed any more.
- Extensions - Type in a new extension or file name.
2.7.3 Skip Extension List
The Skip Extension List allows a global set of rules to be defined which controls which files will not be transferred. A file's extention which matches ANY of the these mask patterns will not be transferred when "Enable Skip List" is checked.
- Extensions - Type in a new extension or file name.
2.7.4 Skip Files List
The Skip Files List allows a global set of rules to be defined which controls which files will not be transferred. A file's name pattern which matches ANY of the regular expression mask patterns wil not be transfered when "Enable Skip List" is checked.
- Pattern in RegEx - Regular expression for the file name.
2.7.5 Skip Directories
The Skip Files List allows a global set of rules to be defined which controls which directories will not be transferred. A file's name pattern which matches ANY of the regular expression mask patterns wil not be transfered when "Enable Skip List" is checked.
- Pattern in RegEx - Regular expression for the file name.
2.8 Search Dialog
The search dialog that helps to find the specific file.
Start the search of the file
Close the dialog
Show the help contents
View the selected file
Edit the selected file
Open the parent folder of the selected file
Put the result list to the original directory pane
<Result list> Shows a list of all files found in the current search operation.
2.8.1 General Tab
This tab allows to search for file names, parts of file names, and text inside files.
- Search for - file name's pattern of the desired files. You can enter the search mask for the files you want to find. The search mask supports *?^[]- pattern characters.
* will match zero or more characters.
? matches one character
^[]- matches a single character in the range, and ^ will reverse the condition.
For example, *.bak *.sik *.old finds all backup files with these extensions, files[1-3].htm will find the first, second and third files in the list. - Search in - one or more starting directories, separated by ";"
- Include Subdirectories - search the subdirectories as well.
- Case sensitive - whether consider the search string's case or not.
- RegEx - Search using regular expressions.
- Find Text - If this option is checked, you can enter text to be searched in the files.
- Find files NOT having the text - Searches for all files which do not contain the given text, but still meet all other search criteria.
2.8.2 Advanced Panel
- Date between -These two fields allow to specify the period of time when the file was last modified.
- File size: search for files smaller or larger than a specific size
- Attributes: Search for files with special attributes. Local files, for instance, hidden and read only. Remote files, for instance, permissions.
2.9 Synchronization Dialog
This dialog helps you to synchronize two folders between local site, remote site, or the zip archive file. When you want to sychronize files between the left and right panel, choose Tools -> Synchronize Directories, and the Synchronization Dialog will be shown.
The top of the synchronization dialog is two drop down combo box. The left drop down combobox shows the left synchronization directory,and the right drop down combobox shows the right synchronization directory. You can choose or input other directories on that site as well.
2.9.1 What to Sync
The options in this group defines the contents of the directory that should be synchronized.
First, you should learn what are the patterns. patterns are used for the inclusion and exclusion of files. '*' matches zero or more characters, '?' matches one character.
In general, patterns are considered relative paths, relative to the base directory (your synchronized directory ). Only files found below that base directory are considered. So while a pattern like ../foo.html is possible, it will not match anything when applied since the base directory's parent is never scanned for files.
Examples:
*.html matches .html, x.html and FooBar.html, but not FooBar.xml (does not end with .html).
?.html matches x.html, A.html, but not .html or xyz.html (both don't have one character before .html).
Combinations of *'s and ?'s are allowed.
Matching is done per-directory. This means that first the first directory in the pattern is matched against the first directory in the path to match. Then the second directory is matched, and so on. For example, when we have the pattern /?abc/*/*.html and the path /xabc/foobar/test.html, the first ?abc is matched with xabc, then * is matched with foobar, and finally *.html is matched with test.html. They all match, so the path matches the pattern.
To make things a bit more flexible, we add one extra feature, which makes it possible to match multiple directory levels. This can be used to match a complete directory tree, or a file anywhere in the directory tree. To do this, ** must be used as the name of a directory. When ** is used as the name of a directory in the pattern, it matches zero or more directories. For example: /test/** matches all files/directories under /test/, such as /test/x.html, or /test/foo/bar/xyz.html, but not /xyz.xml.
There is one "shorthand": if a pattern ends with / or \, then ** is appended. For example, mypackage/test/ is interpreted as if it were mypackage/test/**.
Example patterns:
**/CVS/* |
Matches all files in CVS directories that can be located anywhere in the directory tree.Matches: CVS/Repository
org/apache/CVS/Entries
org/apache/jakarta/tools/ant/CVS/Entries
But not:
org/apache/CVS/foo/bar/Entries (
|
org/apache/jakarta/** |
Matches all files in the org/apache/jakarta directory tree.Matches: org/apache/jakarta/tools/ant/docs/index.html
org/apache/jakarta/test.xml
But not:
org/apache/xyz.java
(jakarta/ part is missing). |
org/apache/**/CVS/* |
Matches all files in CVS directories that are located anywhere in the directory tree under org/apache.Matches: org/apache/CVS/Entries
org/apache/jakarta/tools/ant/CVS/Entries
But not:
org/apache/CVS/foo/bar/Entries
(foo/bar/ part does not match) |
**/test/** |
Matches all files that have a test element in their path, including test as a filename. |
When these patterns are used in inclusion and exclusion, you have a powerful way to select just the files you want.
- Include, exclude - the patterns for you to include or exclude in the synchronization. It is a comma-separated list of patterns of files that must be included/excluded. When both inclusion and exclusion are used, only files/directories that match at least one of the include patterns and don't match any of the exclude patterns are used. If no include pattern is given, all files are assumed to match the include pattern (with the possible exception of the default excludes). The default excludes are empty in CrossFTP.
- Include Sub Directories - whether sub directories should be included for the synchronization.
- Follow Symbolic Link - whether the symbolic link should be followed or just treated as a normal file. If symbolic link needs to be followed, linked file/directory will be retrieved.
2.9.2 How to Sync
Describe the way how the comparison should be made for two directories' synchronization.
- Mirror Left to Right - Treat the Left side directory as the basis, and copy every files from left to right. If a file with the same name appeared simultaneously on the left and right, and two files are checked as different, the right side file will be overwrited. If a file appears only on right, you can choose to keep it, or by choosing "Delete Unnecessary Files" to delete it.
- Ignore Date - If it is checked, CrossFTP does not compare the file's last modified date, and treat them as the same if they have the same size. If it is not checked, two files with same siez are treated as different if they have the last modified date differ larger than a given threshold. You can change the server's time zone at the Site Manger -> Actions.
- Delete Unnecessary Files - In the Mirror Left to Right mode, if a file appears only on right, the right side file will be overwrited if this option is selected. Otherwise, no action will be performed on the right side file.
- Case Sensitive - whether the file name's comparison are case sensitive.
Preview the synchronization result. It will retrieve all the files patterns from the synchronization directories, compare the patterns, and then list the comparison result on the synchronization table below.
Stop the preview.
Get help information of synchronization.
2.9.3 Filters
Refines the synchronization results by a number of comparison filters.
- Right Direction - Keep or filter all the items that need to copy towards right side.
- Left Direction - Keep or filter all the items that need to copy towards left side.
- Equal - Keep or filter all the items that left and right sides are treated as equal.
- Unequal - Keep or filter all the items that left and right side are treated as unequal.
- Last Modified in - You can define the number and interval (days, hours, minutes) that the file's last modified time should be within. If selected, only items that meets the last modified condition are appeared in the result set.
Put the previewed result set in the queue and close the synchronization dialog.
Save the what, how, and filters setting in the queue as one queued synchronization item. You can start the queue to process this synchroniztion item by queue threads, shedule the item for future processing, save/load this queue, or modified the synchornization item in the synchorniztion dialog. The synchornization dialog will be closed and the item will appear in the current queue.
Close the synchronization dialog and do nothing.
There are two directory combo boxes below the options pane. The left one helps you to quickly locate the synchronization subdirectory in the result set, while the right one helps you to quickly locate the item by keywords.
2.9.4 Synchronization Result Table
This table shows the previewed synchronization result from the preview. You can change the synchronization behaviors for the items in the result or remove some items. After checkout, you can put the items in the synchronization table to the queue by press button.
The columns in the synchronization table are Name, Size, Last Modified for the left and right side files respectively, and the direction (Left, Right, Equal, Unequal). All items are shown in Green, Blue, Black, and Red for the Left, Right, Equal, and Unequal directions respectively.
The popup menu in the synchronization table contains:
- Default Direction - Recover the default direction for the item(s).
- Remove Selection - Remove the selected item(s) in the result set.
- Left to Right - Change the selected item(s)' direction to Right.
- Right to Left - Change the selected item(s)' direction to Left.
- Reverse Direction - Reverse the selected item(s)' direction.
- View Left - Quick view the left side file's content.
- View Right - Quick view the right side file's content.
2.10 View Certificate Dialog
View the selected Certificate's detail information, including its general information, detailed name value-pairs information, as well as its trusted certification path.
Copy/Export the certificate as a der/pem file.
Close the View Certificate Dialog.
2.10.1 General
- Certification Information describes the places this certificate can be applied to.
- Issued to shows the organization of which this certificate is issued. Please check whether this field agrees with the site you are connecting to.
- Issued by shows the authorization which provides this certificate. You should carefully check this information to make sure it is a trusted authroization.
- Valid From and to is the certificate's validation period. Although rarely happened, you should pay more attention to the remote site if its certificate expires to avoid security risks.
2.10.2 Details
A full list of name-value pairs that appear in this certificate. You can look through all the information you are interested in.
2.10.3 Certification Path
This tab shows the trust path of the certification that proves its validation.
2.11 Queue Restore Dialog
Restore the unfinished job queue in the previous sessions, and put the job in the current queue. You can also restore the crashed job queue in previous crashed/unresponsive sessions.
Show help information for the Queue Restore Dialog
Delete the selected job queue. Warning: the deleted job queue cannot be recovered!
Show the hidden job queue which is generated during a crash/unresponsive session. You can use this mode to restore your lost queue during a crash.
Close the queue restore dialog.
Restore the selected job queue and put the queue in the current queue.
2.12 CloudFront Distribution Edit Dialog
This dialog helps you to edit the Amazon CloudFront Distribution information. A number of fields can be modified:
- Enable Amazon CloudFront Distribution - To enable/disable this Amazon CloudFront Distribution.
- Domain Name - Shows the domain name of the distribution.
- Status - Displays the current status of this distribution. The possible values are deployed, InProgress.
- Comments - Edit the comments for the distribution.
- CNAME - You can add or remove the list of CNAMES for the distribution. CNAME is a record in a DNS database that indicates the true, or canonical, host name of a computer that its alias are associated with. An example of the CNAME is www.crossftp.com
Apply and submit the edition.
Cancel the edit.
2.13 Extra Allowed Host Names
This dialog helps you to add the extra allowed host names when the server's certificate CN is different from the server's hostname during the Strict verification. During a TLS/SSL handshaking, CrossFTP will verify the server's certification and hostname. Three level of verifications will be provided: Strict (certs and hostname), Default (certs only), and Allow All (no check). You can setup the verification level at the Global Options -> Connection.
2.14 Transfer Logs
This dialog shows the transfer history of the CrossFTP. You can setup the number of history files you want to keep, browse/search your transfer history, and delete the transfer history.
3. Main Menus
3.1 File Menu
New Connection To...
Create a new Connection to the remote site
Add Batch Download ...
Add a list of file/directory download for the FTP site, and save them to the selected directory. The added list will be put in the transfer queue.
New Session
Start a new instance of the CrossFTP.
Exit
Stop all the transfers, disconnect from the remote sites, and quit this instance of the CrossFTP.
3.2 Edit Menu
Select All
Select all files/directories in the active directory panel.
UnSelect All
Unselect all files/directories in the active directory panel.
Invert Selection
Invert the selected files/directories in the active directory panel. All the selected items will be unselected, and the remaining items will changed as selected.
3.3 View Menu
Quick Connect
Show/hide the quick connect bar and search bar.
Command Line
Show/hide the command line bar.
Queue
Show/hide the queue panel and log panel.
Queue Position
Defines the position of the queue panel in the main window.
- Bottom - whether the queue panel will be located at the bottom or upside of the directory panels.
- Left - whether the queue panel will be located at the left or right side of the log panel.
3.4 Sites Menu
3.4.1 Site Manager...
Open the Site Manager window.
3.4.2 Password Protection
By default, the passwords in CrossFTP's site file are encrypted to keep your passwords' safety. Password protection menu further allows you to set a special master password to protect all your sites' passwords. Once you set up the master password, you need to provide this master password when you launch CrossFTP.
You can copy the user name and passwords from CrossFTP if you have never set a master password. Once you set a master password, or imported a CrossFTP site file which is setted with a master password, all your site's passwords will no longer be allowed to copy/export, even after you cleared the master passwords. This helps to further improve your security level.
ATTENTION: You must remember this master password since there is no other ways to recover your sites' passwords.
Tips: Due to the clear text transfer for normal FTP protocol, passwords can be sniffed by malicious network program. For secure login/transfer considerations, please use the FTPS/TLS, SFTP/SSH, WebDav/HTTPS, or S3/HTTPS protocols, which encrypt the whole login session for your safety.
- Set Master Password - Setup a new master password to encrypt your sites' passwords. Please make sure you remember the master password!
- Change Master Password - Change the master password. Please make sure you remember the password!
- Clear Master Password - Clear the previous master password so that you do not need to provide the master password when launch CrossFTP. You still cannot copy/export the sites' passwords after this clear.
3.4.3 Lock
Lock the CrossFTP program. You must setup a master password to enable this option. To unlock the program, you need to supply the master password.
3.4.4 Import ...
Import the site bookmarks to the CrossFTP's selected category from other FTP programs, such as lftp, text file, etc.
Show the help content for the Import site bookmarks.
Import the site bookmarks from the file and close the dialog.
Cancel the import and close the dialog.
- Type - The kind of supported site bookmarks types by CrossFTP. Currently CrossFTP supports:
- CrossFTP
- lftp
- FlashFXP v3.x Sites (Sites.dat)
- text file, each line of it has the format: ftp://user:password@hostname:port
- File - type in or browse the file you want to import the site bookmarks from.
- Tips - If the imported site content is not correct in its encoding, choose the proper file encoding by go to Tools -> Global Options -> Display -> Viewer Option.
- Category - the imported site bookmarks will be added to this category.
3.4.5 Export ...
Export the site bookmarks from the CrossFTP's selected category to other FTP programs, such as lftp, text file, etc.
Show the help content for the export site bookmarks.
export the site bookmarks to the file and close the dialog.
Cancel the export and close the dialog.
- Type - The kind of supported site bookmarks types by CrossFTP. Currently CrossFTP supports:
- CrossFTP
- lftp
- text file, each line of it has the format: ftp://user:password@hostname:port
- File - type in or browse the file you want to export the site bookmarks from.
- Category - the site bookmarks in this category will be exported to the file. If no category is chosen, all site bookmarks will be exported.
3.4.6 Remote Profile Backup
Backup/Restore the site bookmarks to/from the remote ftp server.
3.4.6.1 Commit...
Commit the site bookmarks from the CrossFTP's selected category to the remote ftp site for sharing.
- Site - the target site to commit the site list.
- Remote path - the path on the target site to commit the site list to.
3.4.6.2 Retrieve...
Retrieve the site bookmarks from the remote ftp site to the CrossFTP's selected category.
- Site - the remote site to retrieve the site list.
- Remote Path - the path on the remote site to retrieve the site list.
- Category - the retrieved site list will be added to the selected category, or to the root category, if no categor is selected.
3.5 Security Menu
3.5.1 Trusted Servers and CAs
The Manage Your Trusted Server Certificates dialog helps you to manage your trusted Servers and CAs, and you can choose to View Certificate, Add Certificate (Certificates in *.der or *.pem files), Delete Certificate, or Set Password for the keystore.
3.5.2 Client Certificates
The Manage Your Own Private Keys and Certificates dialog helps you to manage your client certificates. You can choose to View Certificate, Add Certificate (Certificates in *.der or *.pem files), Delete Certificate, Set Password for the keystore, Set Private Key for the certificate, or Export Private Key.
3.5.3 Extra Allowed Host Names
Display the dialog for you to setup the extra allowed host names during the TLS/SSL handshaking. See 2.13 for more details.
3.5.4 Cipher Settings
Customize the enabled ciphers for your TLS/SSL session and SSH session.
3.6 Queue Menu
Start Transfer
Start the transfer of the queue items.
 Pause Transfer
Pause the transfer of the queue transfer after finishing the current tranfer item.
 Abort Transfer
Abort the current operation in the directory panels, and stop the transfer of the queue transfer as well.
Schedule
Schedule the selected item(s) for the future transfer.
Advanced
Advanced operations for the queue items
- +/- Transfers - Modify the queue's concurrent transfer number. The default number is 1. CrossFTP Pro allow multiple concurrent transfer so that multiple queue items can be processed simultaneously.
Failed
Process with the failed queue items.
- Reset Selection - Recovery the normal state for the selected queue items if they are marked as failure.
- Reset All Failed - Recover the normal state for all failed items.
- Clear All Failed - Remove the failure items from the queue.
- Mark as Failed - Mark the selected queue item as failure.
Edit
Edit the selected items' properties. The properties include site, path, and name information for the item's source and target.
Move
Move the selected items.
- Move Up - Move the selected items one row up.
- Move Donw - Move the selected items one row down.
- Move to Top - Move the selected items to the top of the queue.
- Move to Bottom - Move the selected items to the bottom of the queue.
Delete
Delete the selected item. Be careful that the delete is not recoverable.
Manage Queue
Control the queue's load, save and restore oprations.
- Restore Queue ... - Restore the queue items into the current queue when the CrossFTP was shutdown with unfinished items las time. At the startup the CrossFTP will try to restore the queue automatically.
- Load Queue ... - Load the exported queue items into the current queue.
- Save Queue... - Save the current queue to the file.
- Clear Queue - Clear the all items in current queue.
Queue Properties...
Display a dialog to show the queue's properties, such as the number of files, directories, file size, etc.
3.7 Tools Menu
Synchronize Directories
Display a synchronization dialog to help you synchronize/mirror the current left and right directories panel. You can save the synchronization settings in the queue for the multi-thread processing/scheduling, or you can preview the synchronize/mirror results, and customize the results for the schronization.
Show Raw Directory
Show the raw directory content and print them in the main log pane.
Clear Session Cache
Clear the cached information during current CrossFTP session. A session means the running CrossFTP instance from its startup to its shutdown. The cache to be cleared includes:
- Cached directory lists
- Cached password for the site
- Cached file overwrite rules when a file with same name exists on the target machine.
- Unmount archived files so that you can delete the archive file you previously browsed.
CrossFTP Server
Launch the CrossFTP Server, a user-friendly secure-enabled FTP Server to share your files.
Ident Server
Launch the Ident Server as described in RFC 1414. The Ident Protocol is designed to work as a server daemon, on a user's computer, where it receives requests to a specified port, generally 113. The server will then send a specially designed response that identifies the username of the current user.
You need to have the root privilege to launch Ident Server on low port (such as 113) on your Mac or Linux. In this case, sudo on Linux to launch CrossFTP, or use graphical tools, such as Pseudo on Mac.
Disk Space Report
A utility tool to find what is occupying your hard disk.
Global Options
Show the Global Options dialog to configure CrossFTP.
Filters
Display the Filters Dialog. It will allow you to skip certain file/directory patterns if you enabled the "Use Skip List" option.
Mimetypes
Edit the mapping configuration for the file extensions and their Mimetypes. The Mimetype configuration file will be edited by your favoriate editor (F4). A popup dialog will be shown, and press yes will allow you to reload the Mimetypes immediately from the modified file. Otherwise, the modificaiton will be loaded when the CrossFTP restarts. The modification will affect the Amazon S3's Mimetype metadata during the S3's transfer, and will update the file's display Icon if Tools -> Global Options -> Display -> Use System Icons is not toggled.
Config Java Web Start
Launch the Operating System's Java Web Start Configuration dialog. You will be able to manage Java Web Start's cached files, install short cuts, and update/delete Java Web Start applications, and so on.
3.8 Help Menu
Help Contents
Show this help manual for CrossFTP.
Feedback
Direct the user to submit all types of feedback.
Register as CrossFTP Pro...
Popup the register dialog for user to register the product as CrossFTP Pro. When registered, all functions labeled as ![]() will be activated in the CrossFTP Pro. To get the series number for CrossFTP Pro, please go the the Purchase/Evaluation page.
will be activated in the CrossFTP Pro. To get the series number for CrossFTP Pro, please go the the Purchase/Evaluation page.
Check for Update
Check and update the lastest CrossFTP version.
About
Display the about dialog for CrossFTP.
4. Main Window Popups
 Transfer (F5)
Put the selected item in the queue and start the transfer. The file will be transferred to the target panel.
Queue
Put the selected item in the queue. The queued files will be transferred to the target panel when you start the queue processing.
Queue to
Help you to queue the selected files to your favorite target paths in an extremely fast way. The target panel's bookmarked folders, as well as the recently visited folders will be listed in the Queue To's submenu. Once you select one of these folders, the files will be queued towards this target folder.
 Search Web "..."
Search the google for the selected item's information.
Edit & Search "..."
Modify the selected item's query and search the google for the information.
Execute
Execute the executable file.
View (F3)
View the content of the selected file.
Edit (F4)
Edit the content of the selected file. The command to execute the editor can be modified at the option.
Edit/Open with ...
Open the selected file with some program. If "Choose program" is selected, the proram choosen dialog will be shown.
Open
Open the
New Shell Here
Open a shell command window here. The execution command of the shell can be modified by going to Tool -> Options -> Operation.
New Folder(F7)
Create a new folder on the current directory. If it is an S3 site, and you are on the Root directory to create an S3 bucket, a dialog will be popuped to ask your S3 bucket location. You can choose either US or EU.
Refresh
Refresh the content of the current directory panel.
Copy URL
Copy the files/directories' URL to the system's clipboard. You are allowed to decide whethe you want to copy the user name and passwords. If you once set the master password or imported a master password protected CrossFTP site file, you will no longer allowed to copy the user name and passwords.
Copy Web URL
Copy the files/directories' web site URL to the system's clipboard. The web site's root is judged according to the FTP's Remote Path and Web URL assigned in the Site Manager -> General.
Preview in Web Browser
Preview the selected file in the Web Browser. The web page's URL is judged according to the FTP's Remote Path and Web URL assigned in the Site Manager -> General.
Copy Torrent URL
If it is an Amazon S3 site, this menu option will be shown to copy the files/directories' torrent URL to the system's clipboard.
Copy Signed URL...
If it is an Amazon S3 site, this menu option will be shown to copy the files/directories' signed URL to the system's clipboard. You will be prompted with an expiration date chosen dialog to choose the signed URL's expiration time. The signed URL allows the public users to access S3 objects without the need of a secret key.
Save Remote Path
Save the remote pane's current path in the site manager's remote path field.
Save Local Path
Save the local pane's current path in teh site manager's local path field.
Rename(F2)
Rename the selected item.
Delete
Delete the selected items
Synchronized Browsing
Allow two panes (left and right pane) to navigate in a synchronized way if two pane's directory hierarchy is similar. This fastens the remote and local site's navigation.
Manage CloudFront Distributions
If this is an S3 site, this menu option will be displayed. It list and manage the available distributions for current bucket, as well as all the distributions. You can create new, edit, or delete distributions in the popup dialog.
Properties...
Show the dialog for the selected files' properties.
5. Tool Bar
Connect
Show the connection popup menu.
Disconnect/unbundle
Disconnect the current panel's connection. If the current panel is bundled with the transfer processing, it will be unbundled from the transfer session as well.
Abort
Abort the current operation in the directory panels, and stop the transfer of the queue transfer as well.
Pause
Pause the transfer of the queue transfer after finishing the current transfer item.
Start
Start the transfer of the queue items.
 Refresh
Refresh the content of the current directory panel.
Transfer(F5)
Put the selected item in the queue and start the transfer.
6. Short Cut Keys
| F1 | Help |
| F2 | Rename |
| F3 | View |
| F4 | Edit |
| F5 | Transfer/Copy |
| F7 | Make Directory |
| F9 | Site Manager |