 CrossFTP - Amazon S3 Client
CrossFTP is a powerful Amazon S3 client. CrossFTP makes it extremely simple to use "Simple Storage Service" (Amazon S3), "Amazon CloudFront" (Amazon's CND), and sign public/private URLs. It helps to do uploads, downloads, backups, site to site data migration, metadata modifications, schedules, and synchronize S3 with ease.
 |
Download | Features |
Key features:
- Amazon S3 Support - Store files on S3 with easy!
- Batch Transfer - Perfect reliability guarantees trouble-free tasks.
- Mulitple S3 accounts - manage sites in site manager.
- Multi-part upload - (PRO) Upload large files more reliable.
- Multipart download - (PRO) Make transfer fast and reliable.
- Glacier backup solution - cost-effective backup support
- CloudFront Distribution Support - Distribute the content.
- CloudFront Invalidation - (PRO) One click invalidate CDN objects.
- Sign URLs - (PRO) S3/CloudFront public/private signed URLs.
- Bucket Policy Editor - (PRO) Make syntax highlighted and valid.
- S3 Lifecycle Management - (PRO) Transite S3 object to Glacier.
- S3 Logging - (PRO) Manage Logging configs on S3.
- DevPay - (PRO) Allow application to utilize DevPay API.
- Request pay - Pay by requester instead of account owner.
- MIME Types - Change the default MIME types for the files.
- Previews with Zoom - Smoothly zoom and preview.
- Multipart download - (PRO) Make transfer fast and reliable.
- Metadata Modification - (PRO) change the HTTP headers.
- Edit Anywhere - (PRO) Edit any files in any app.
- Turbo Engine - (PRO) Multi-thread enigne speed up your work!
- Scheduling - (PRO) Put your transfer/sync tasks in plan.
- Client Side Encryption - (PRO) Encrypt your files before transfer!
- GZip Compression - (PRO) compress the data to save the bill.
- Password Encryption - Protect the security of your account.
- Search - Narrow a long list of files in your bucket.
- Synchronization - (PRO) Synchronize local and S3 data visually.
- HTTP/Sock/FTP Proxy - (PRO) proxy and NTLM auth support.
- S3 Compatible Sites - DreamObjects, Walrus, etc.
- Unbeatable Price - powerful Amazon Glacier, FTP, FTPS, SFTP, FXP, WebDav, Amazon S3, Microsoft Azure, and Google Storage client!
- and much more!
How to ...
Connect to Amazon S3
1. If you have no S3 account yet, sign up a new S3 account.
2. Obtain the login credentials (Access Key ID and Secret Access Key) from your account's Security Credentials page, or you can use AWS Identity & Access Management (IAM)'s created credentials to connect.
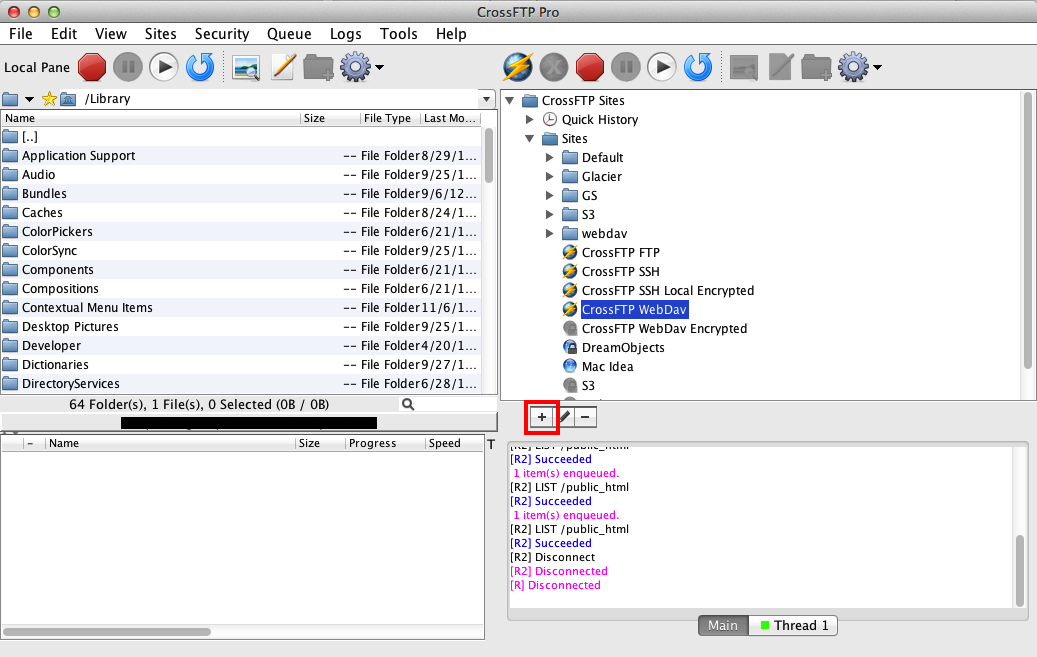
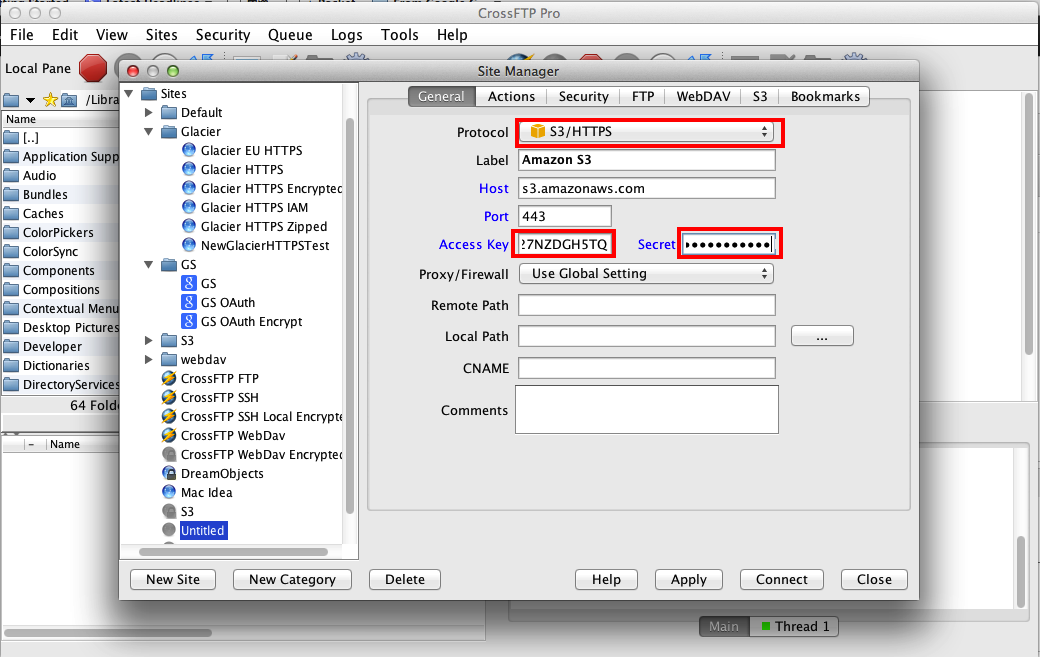
3. Create a new Site in CrossFTP, choose Protocol as S3/HTTPS, or S3, and fill in the Access Key and Secret Key.
Third Party S3 Providers
Create a Bucket
Each of the files and folders stored in Amazon S3 is contained in a bucket. It's like "top level folder" or "top level drive". Bucket names are globally unique. If you want to use these buckets for web hosting, try to choose a bucket name, which is a valid host name and everything should be lower case.
To create a bucket in CrossFTP, just go to the root folder /, and choose New -> Bucket from the popup context menu, or press the new Folder button. You will be allowed to choose where your bucket's region is.
Mount External Bucket
You can access buckets owned by someone else if the ACL allows you to access. To mount such a bucket, you can choose Bucket -> Mount External Bucket ... from the popup context menu, and enter the bucket name in the dialog.
Storage Class
Reduced Redundancy Storage (RRS) is a storage option within Amazon S3 that enables customers to reduce their costs by storing non-critical, reproducible data at lower levels of redundancy than Amazon S3's standard storage.
For existing files you already uploaded on S3, you can find their storage classes by right click on the file pane's column head, and toggle Storage Class from the popup menu.
To setup the RRS for the storage class, you can:
- Use Case 1. New File - you can toggle Sites -> Site Manager -> S3 -> Reduced Redundancy Storage (RRS), and then all new uploaded files will be in RRS storage class.
- Use Case 2. Existing File - choose the files/folders in the file pane, and choose Properties... -> Metadata from the popup menu. On the metadata dialog, press + button, and select Key as x-amz-storage-class, and Value as REDUCED_REDUNDANCY for RRS, or STANDARD for default S3 class storage.
For more details, you can check this page.
Transit Data to Amazon Glacier
You can define Lifecycle Rule to archive an object to Amazon Glacier and the object will no longer be immediately accessible. The transited objects will be visible in S3 with storage class GLACIER. You can find the S3 objects' storage classes by right click on the file pane's column head, and toggle Storage Class from the popup menu. For more details, you can check this page.
If you want to upload the files to Amazon Glacier directly without passing through S3, you can use CrossFTP as Amazon Glacier client.
Access Control (ACL)
To view the ACL of objects on S3, right click on the file/folder, and choose Properties ...-> General to view the ACL list of the objects. The following permissions can be set for the grantee: READ, WRITE, READ ACP (read the object's ACL), WRITE_ACP (write the object's ACL), and FULL_CONTROL (grant all permissions).
To setup the ACL for objects on S3, you can:
- Use Case 1. New Files - you can define the ACL when create new file/folder on the S3. You can choose to define a default ACL permission, or inherit the ACL permission from the parent folder, or use the source's ACL permission during the S3 to S3 copy. For more details, check this page.
- Use Case 2. Existing Files - you can update the files' ACL by right click on the files/folders, and choose Properties ...-> General, and click Commit to apply the new ACLs. Toggle "Apply change to subfolders" if you want to apply the ACL to the child files/folders. If you want to batch process the ACL update, you can right click on the files/folders, and choose Queue Operations -> Change Properties ... -> General. After that, changes can be enqueued and processed by the multi-thread queue engine.
Metadata
The custom HTTP header and S3 properties are available in Metadata. You can view file/folder's Metadata by right click on them, and choose Properties ... -> Metadata from the popup menu.
Tip: Use curl -I <http://<bucketname>.s3.amazonaws.com/<key> to debug HTTP headers.
To setup the Metadata or HTTP headers (e.g., Cache-Control) for objects on S3, you can:
- Use Case 1. New Files - you can setup the custom metadata's key/value pairs at Site Manager -> S3 -> Enable Default Metadata.
- Use Case 2. Existing Files - you can update/remove existing object's metadata by right click on them, and choose Properties ... -> Metadata from the popup menu. If you want to batch process the Metadata processing, you can right click on the files/folders, and choose Queue Operations -> Change Properties ... -> Metadata. After that, changes can be enqueued and processed by the multi-thread queue engine. For more details, check this page.
- Use Case 3. MIME types - you can change the default mime types for the file extension by Tools -> MIME Types...
Encryption
- Server Side Encryption - this can be enabled for all uploads by Sites -> Site Manager -> S3 -> Enable server side encryption.
- Client Side Encryption - this can be enabled for all uploads by Sites -> Site Manager -> Security -> Local Encryption for File Transfer -> Enable encryption. For more details, see this page.
Compression
GZip based data compression is supported, just choose Sites -> Site Manager ->Options -> Data Compression. After that, all files uploads for this site will be automatically compressed. In the log window, you should be able to find the messages like "GZip Compressed". In the Metadata file, you should be able to find key "crossftp-compression", and value "gzip". The download process will automatically uncompress the files.
CloudFront Distribution
CloudFront is a web service that speeds up distribution of your static and dynamic web content. To manage the CloudFront Distribution and private distributions, just choose CloudFront Distribution -> Manage CloudFront Distributions from the context manual. For more details, check this page.
URLs
You can generate all types of URLs by right click on the objects, choose URL..., and press Generate. It can used to generate the normal URL and paths, as well as the following specific URL types:
- BitTorrent URL - Toggle "Generate BitTorrent URL" option on the URL dialog.
- Signed URL - Toggle "Sign URL with expiration date" option on the URL dialog.
- Signed URL for Private Distribution - Make sure you've properly defined the private distribution. Choose the <Private Distribution> from CNAME option on the URL dialog, config Signing policy, and then sign the URL with expiration date. For more details, check this page.
MultiUpload
Large files can be uploaded in parallel by the Multipart upload feature in S3. You can setup the part size at Tools -> Global Options -> S3/Glacier -> Multi-upload Part Size.
Direct S3 to S3 Copy
If you want to copy files from one S3 location to another S3 location, or account, without passing through the local computer, you can simply open the source and target S3 location on the left and right panels respectively, and do the transfer. All files will be copied directly on the S3 server side.
Reviews
- "The way CrossFTP handles transfers makes it the fastest FTP client" - Lars Koudal, Fastest FTP client for MacOS.
- "a must-have tool for those who are frequently moving files", Mehedi Hasan, Best Linux FTP Client: Top 10 Reviewed.
- "It's a reliable app, the kind that extensively helps your work" - Mihai M., 5 Star Softpedia Editor's Review.